
Illustrator Hacks All Designers Need to Know!
- Ali Menard

- Oct 5, 2022
- 5 min read
Updated: Nov 1, 2023

Not too long ago, I went down a late night rabbit hole on Instagram Reels watching videos on design/photography hacks. I was blown away by not only the variety of content I found but by the number of reels I ended up saving because they were all things I wanted to attempt on my own. It got me thinking about all the little tricks I have learned over the years (or discovered by accident) and how these “hacks” could help other designers. So why not put together a list of these “hacks”?
Command/Ctrl + d
You want a row of stars that are the same shape and same size and equally spaced apart. You could take the time to copy and paste, use the alignment tools and the ruler to guarantee they were perfectly spaced out and align with one another or another technique one could use is command/ctrl + d. Start by creating a star using the star shape tool (pro tip: hold down the shift key to keep the star straight) and keep it selected. Then, hold down the alt/option key and drag it to your desired location. When doing this you want to make sure the purple guideline appears indicating the second star will be in line with the first star. Then with the second star still selected, use command/ctrl + d and it will replicate your last move. Continue to click command/ctrl + d as many times as desired and BAM you have a row of stars that are all the same shape, size and are perfectly spaced out.
Pro tip: select the entire row of stars and use the same technique to create a patterned background.

Another way to use the command/ctrl + d technique is to use it to make a pin wheel. Start by creating a simple triangle. With the triangle selected, select the rotate tool from your control panel on the left-hand side or click the r key on your keyboard. Once the rotate tool is selected, hold down the alt/option key and click just below the tip of the triangle. A screen will appear that allows you to choose an angle. Start by entering 20 degrees into the angle box. Then click “copy”. After the second triangle appears, you can use the command/ctrl + d trick to make a complete circle.
Pro tip: change the fill color of the pin wheel to gradients of orange and yellow to create a ray of sunshine for an illustration

Crystalize Tool
This hidden gem can turn an ordinary shape into something unique instantaneously. Create a circle, select the crystalize tool and click and drag it around the circle to see what happens. You will end up with something like the picture below.
Pro tip: you could use this to illustrate a character’s unique hair or something to that affect.

Erasing In a Straight Line
A little trick I didn’t know was possible until recently, is to use the eraser tool to make a straight line. For example, you have a row of boxes where none of the tops line up and none of the bottoms line up. You need the bottom of all the boxes to line up, but you want the top of the boxes to stay exactly as they are now. All it takes is to select the eraser tool or use the key command shift + e, then hold down the alt/option and click and drag where you want to erase.

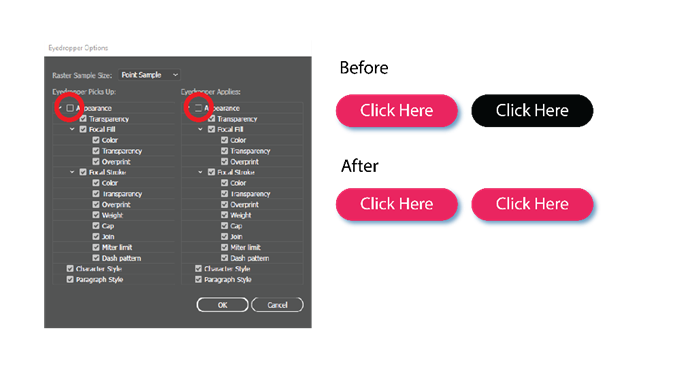
Expanded Eyedropper Tool
All designers know that they can select color from a picture or shape using the eyedropper tool and the tool automatically makes whatever you have selected exact color as the image you eye dropped. But what a lot of designers don’t know is you can take it even further by forcing the eye dropper to not only copy color but appearance as well. For example, you have two shapes side by side. The shape on the left is pink with a blue drop shadow. The shape on the right is black with no drop shadow. You want both shapes to look exactly the same, but you don’t want to mess up the layout by using copy and paste.
Double click the eye dropper tool in the tools panel and a box will appear. At the top of the box, check the box labeled “Appearance” on both sides and click okay. Then use the eye dropper tool exactly as you would before except this time it will copy not only the color of the shape, but it also applies any effects such as a drop shadow. Keep in mind that once you change this setting, it will automatically stay like that the next time you open illustrator. If you want the eye dropper to only pick up color and not appearance, you will have to go back and uncheck that box.
Creating Guides for Shapes Or Drawings
Designers already know that you can create vertical and horizontal guides by dragging lines from the ruler. But did you know you can also create guides for shapes and illustrated work? Using either the pen tool or the pencil tool, make an illustration using line work. Then, click command/ctrl + 5. Now you have a guideline for that shape.
Pro tip: when using guidelines, the automatic setting is locking them into place. Nine times out of ten, you aren’t going want them to move. But when you need to move a guideline around without redoing all of them, there is a way to do so. Go to “View” > “Guides” > “Unlock Guides”. Once you have done that, you can select the guide you want to change and either delete it or simply move it to your desired location.
Pro tip: to toggle between seeing what your artwork looks like with and without guidelines, use command/ctrl + ;
Scaling Strokes
How annoying is it when you spend a significant amount of time creating an illustration with beautiful line work but when you go to scale down your illustration, suddenly your line work is super thick and has created big points that stick out? One way to avoid this is to turn the line into a shape by selecting the line work and going to Object > Expand. However, when using this method, if you wanted to change the thickness of a line after expanding it, you are not able to do so. Turns out, there is another way to avoid this. If you are using windows, you will want to go to Edit > Preferences > General. If you are on a Mac, go to Illustrator > Preferences. Once you bring up this screen there is box that is labeled “Scale Strokes & Effects”. Check that box. Now, when you scale illustrations down, your line work will not be affected. Just like the setting change when using the eyedropper tool, this will automatically be checked the next time you open illustrator.
Shape Builder Tool
Designers know the pathfinder tool can be very useful when illustrating to unite shapes together, subtract lines from shapes, intersect shapes, or exclude shapes. But another way to combine shapes or subtract shapes from other shapes is to use the shape builder tool. For example, let’s say you wanted to make a simple cloud. Start by using the ellipse tool and creating ovals in a cloud like shape. Then, select the shape builder tool or use the key command/ctrl shift + m. To combine the shapes, simply click and drag your mouse where you want to connect the shapes. If you want to subtract parts of the shape, hold down the alt/option key while using the shape building tool.
Pro tip: click inside each section of overlapping lines to create individual shapes. Only click inside of a section once because if not you will end up with multiple shapes on top of each other and not know it. For example, if you click inside the same section three times, the shape builder tool creates three shapes layered on top of each other.


